Easy Website Password Protection Tutorial
You can now easily implement password-protected pages to protect folders in your web site. Use these password protected directories to sell downloadable products or provide premium access to members. In this password protection tutorial, we will explain how to create access authorization using only FTP. This will be helpful to most webmasters who want to create authentication files but who do not have SSH or Telnet access. Unfortunately, most of the restricted access tutorials assume that the webmaster can use SSH or Telnet, which of course, is not true. Now you can sell your software, documents, images or music online. You can easily protect files and directories that require the use of a username and password, and you don't have to be a computer programmer to do it!
Requirements.
You own the domain name and maintain the site. Your site is on an Apache based web server. (Windows IIS servers do not support .htaccess) You have FTP access. Let's Do It!
We will be creating three separate files contained in two separate directories on your website. Elements in blue bold should be replaced with your customizations.
http://www.yourdomain.com/protect/myproduct/index.htm
http://www.yourdomain/hidden/myproduct/.htpasswd
http://www.yourdomain.com/protect/myproduct/.htaccess"); ?>Notice that the last directory of each file path has /myproduct/ in common. The reason for this is so that later, when you add additional products, it will be easier to create a unique username and password for each of your downloadable products, and to keep track of it all. Just rename the /myproduct/ directory with the names of each of your additional products.
1) Create the page(s) you want protected. This could be anything you want limited access to. For example, it could be a special document, or an image, a music file, software, or anything. Name the page:
http://www.yourdomain.com/protect/myproduct/index.htm"); ?>
Publish (upload) it in the normal way you would publish any other web page. Notice that the directory, /protect/ is a dedicated directory just for password-protected files. (You could name it anything you want.) Repeat this process for each page or file you want protected.
2) Create the .htpasswd file. This is the file that contains the secret username and password that corresponds to the page you want to protect. We do two things to help prevent people from discovering this information. (1) The password is encrypted. (2) The file itself is hidden in a different directory than the one of the page being protected.
First, we have to create the encryption: If we had SSH or Telnet access, there is a procedure to use the unix apache server to create the crypt code needed, right on your own server. Since most webmasters do not have Telnet access, you can build the appropriate encryption by using our form below:
Just type in the username and the password you have chosen for the page you want to restrict.
username is interlogy
password is opensesameAfter running it through the encryption, you get a login and encrypted password:
interlogy:9lljfi88eqp5s"); ?>
(Please note that every time you run the same username and password, you end up with a different encrypted password. This is the whole point of one way encryption! But they will all work!)
Copy and paste this combination (username matched with encrypted password) into a simple text file.
Now save the file. Windows does not allow you to save a file beginning with a . So just save it as htpasswd.txt and change the name remotely after you FTP it.
Upload the file to the /hidden/myproduct/ directory on your site using your FTP program. (You must use in ASCII mode for this or it wont work!)
Now, remotely change the name of the file to .htpasswd
3) Create the .htaccess file. This is the file that does the magic. When the browser detects this file, it will display a request for username and password before allowing a visitor to see the desired file. This file affects the directory and all sub-directories in which it is placed.
In a new text file, type the following:
AuthUserFile /home/yourdomain/docs/hidden/myproduct/.htpasswd
AuthGroupFile /dev/null
AuthName \"Restricted Access\"
AuthType Basic<Limit GET>
require user interlogy
</Limit>"); ?>AuthUserFile tells the server that it will find the file containing the passwords (.htpasswd) in the directory called /hidden/myproduct/
It needs to be the full UNIX pathname of where the .htpasswd file is stored. Your web host can provide you with this information.AuthGroupFile tells the server where to find the group file. You only need a group file if you have multiple usernames and passwords for the same password-protected page. Just leave it as /dev/null to leave this function unused.
AuthName specifies what shows up on the entry box when the browser asks the user to enter a password. You can write whatever you want here.
AuthType describes the type of authentication were using. In this case, its Basic.
<Limit GET> is an HTTP request for a file that is sent by a browser to a server. This line limits the power of GET by saying that only the valid user may look at files in this directory. If you want to allow other methods (particularly in CGI directories), you can specify them separated by spaces in the LIMIT directive. (LIMIT GET POST PUT)
Add one blank line at the end of the .htaccess file or it wont work!
There must not be any spaces or special characters after any of the lines.Now save the file. Windows does not allow you to save a file beginning with a . So just save it as htaccess.txt and change the name remotely after you FTP it.
Upload this file to the /protect/myproduct/ directory on your site using your FTP program. (You must use in ASCII mode for this or it wont work!)
Now, remotely change the name of the file to .htaccess
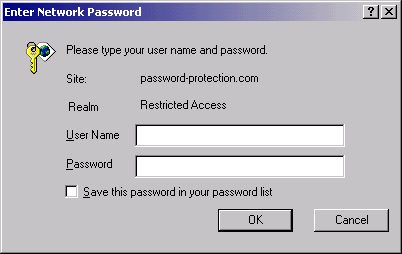
When someone attempts to access the password-protected page, their browser will display a request for authentication. The user must type in the correct username and password. Once this is done, they will gain immediate access to the desired page.
Repeat the above process for any web page or file you wish to have restricted access.
For more details on this subject, please consult the following sources:
How To Create a Password Protected Page
NCSA httpd documentation on .htaccess files.
Mosaic User Authentication Tutorial

This article is brought to you by Interlogy Internet Technologies which produces professional password protection scripts. For more information, please check out password protection and community management case studies for Profile Manager Premium below:
JotForm has been released!
First web based WYSIWYG Form Builder has been released.
Memberkit, our new membership software!
Memberkit is flexible and extendable membership and social networking software that makes content and membership management a breeze.